 Save
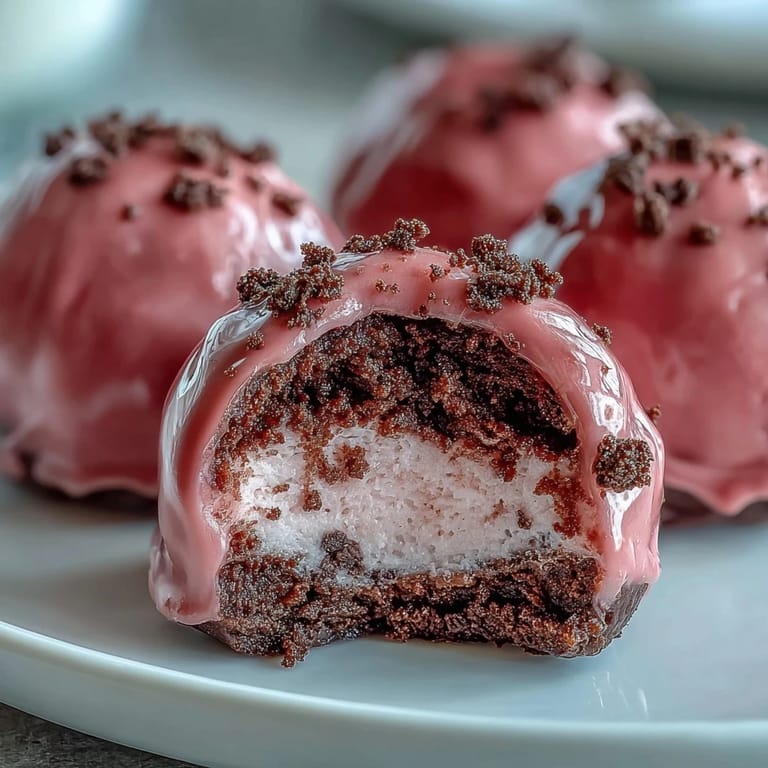
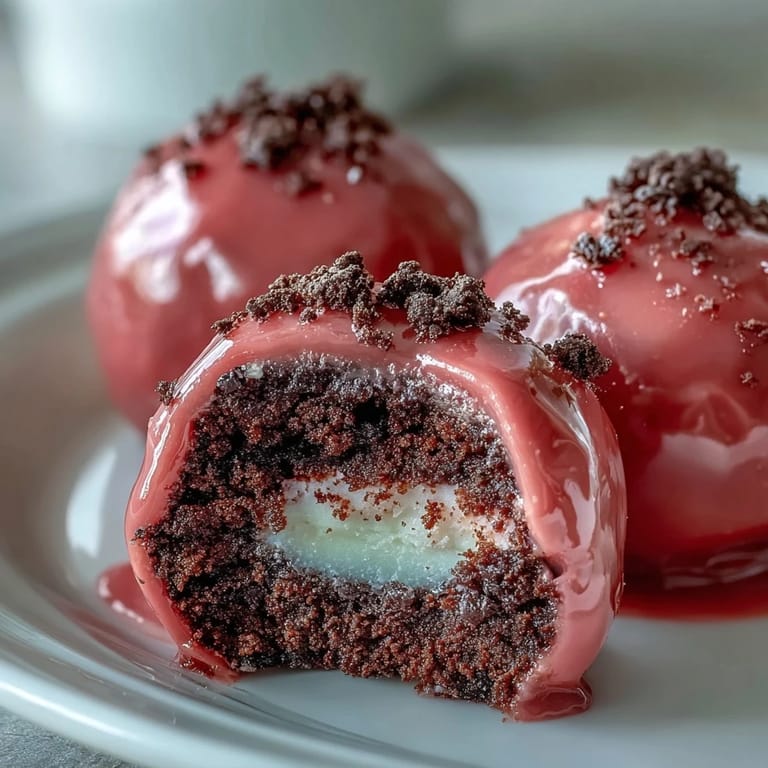
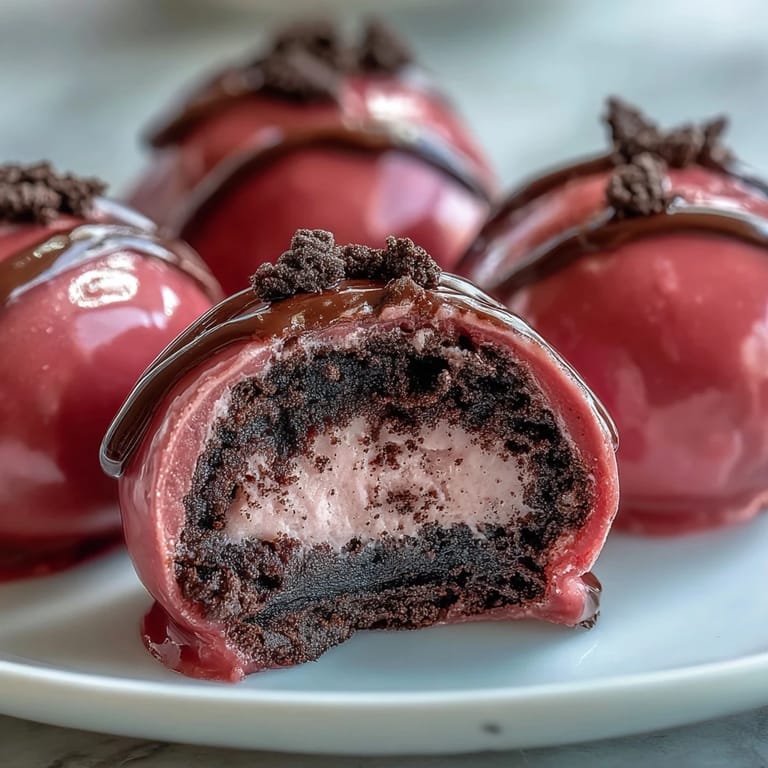
Save My cousin showed up to a baby shower last spring with a tray of these, and I watched them vanish in under ten minutes. The pink coating cracked under my teeth, giving way to something so soft and fudgy I had to corner her in the kitchen for the recipe. She laughed and said it was just Oreos and cream cheese, which sounded too simple to be that good. I made my first batch that weekend, and now I keep a stash in the fridge for when I need something sweet without turning on the oven.
I brought a batch to a potluck once, worried they looked too plain next to the fancy layer cakes and pies. But people kept coming back, asking what was in them, surprised that something so rich started with store-bought cookies. One friend even texted me later that night for the recipe. It reminded me that sometimes the simplest treats are the ones people remember.
Ingredients
- Oreo cookies: Use the whole cookie, filling and all, for that signature cookies-and-cream flavor that needs no extra sugar.
- Cream cheese: Let it sit on the counter until it is soft enough to blend smoothly without lumps, or the truffles will have a grainy texture.
- Pink candy melts: These create a candy shell that sets firm and glossy, and you can swap the color for any occasion.
- Vegetable shortening: A small spoonful thins the melted candy just enough to make dipping easier and the coating smoother.
- Sprinkles or edible pearls: A handful of these on top adds a festive touch and a little extra crunch.
Tired of Takeout? 🥡
Get 10 meals you can make faster than delivery arrives. Seriously.
One email. No spam. Unsubscribe anytime.
Instructions
- Crush the Oreos:
- Pulse the cookies in a food processor until they turn into fine, dark crumbs that smell like childhood. If you do not have a processor, seal them in a zip-top bag and roll them with a rolling pin until no big chunks remain.
- Mix the truffle base:
- Stir the softened cream cheese into the crumbs with a spatula until the mixture is uniform and sticky, with no streaks of white. It should hold together when you press it between your fingers.
- Shape the truffles:
- Scoop out tablespoon-sized portions and roll them between your palms into smooth balls, then set them on a parchment-lined baking sheet. Your hands will get messy, but the truffles will firm up beautifully.
- Chill until firm:
- Pop the tray into the refrigerator for 30 minutes, or the freezer for 15, until the truffles are cold and hold their shape when you pick them up. Warm truffles will fall apart when you dip them.
- Melt the candy coating:
- Heat the candy melts in a microwave-safe bowl in 30-second bursts at medium power, stirring after each one until the coating is smooth and glossy. Stir in the shortening if you want a thinner, shinier finish.
- Dip each truffle:
- Use a fork to lower each chilled ball into the melted candy, turning gently to coat it completely, then tap the fork on the edge of the bowl to shake off the excess. Slide it back onto the parchment and repeat.
- Decorate while wet:
- Sprinkle on your decorations immediately, before the candy sets, so they stick without sliding off.
- Let the coating harden:
- Leave the truffles at room temperature until the coating feels firm to the touch, or chill them in the fridge for 10 to 15 minutes if you are in a hurry.
- Serve and store:
- Keep the finished truffles in an airtight container in the refrigerator for up to a week. Serve them cold for the best texture contrast.
 Save
Save The first time I made these for a birthday party, I ran out of pink candy melts and finished the last dozen in white with rainbow sprinkles. Everyone loved the variety, and now I deliberately make them in different colors just to see the surprise on people's faces when they pick one up. It is a small thing, but it makes the platter feel more playful and less predictable.
Choosing Your Candy Melts
Pink candy melts give these truffles their signature look, but you can use any color that suits your event. I have done pastel blue for a baby shower, deep red for Valentine's Day, and even orange and black for Halloween. If you cannot find the exact shade you want, buy white candy melts and tint them yourself with oil-based food coloring, not water-based, which will make the candy seize and turn grainy. A few drops go a long way, so start small and add more until you reach the color you like.
Getting the Smoothest Coating
The key to a glossy, even coating is controlling the temperature and thickness of your melted candy. If the candy is too thick, it will coat the truffles in a heavy shell that tastes waxy instead of snappy. Adding a teaspoon of vegetable shortening thins it just enough to create a delicate layer that cracks cleanly when you bite in. Stir gently and avoid overheating, because candy melts can go from smooth to seized in seconds if they get too hot or come into contact with even a drop of water.
Make-Ahead and Storage Tips
These truffles are perfect for making ahead because they hold up so well in the fridge. I often roll and chill the truffle balls a day or two before I plan to dip them, which breaks up the work and makes the whole process less rushed. Once coated, they stay fresh in an airtight container for up to a week, and the coating keeps them from drying out or absorbing odors from the fridge. Just let them sit at room temperature for a few minutes before serving if you want the filling to soften slightly.
- Roll the truffle balls and freeze them for up to a month, then thaw and dip when you are ready.
- Store finished truffles in a single layer, or separate layers with parchment to keep the coating from sticking.
- Avoid leaving them out at room temperature for more than an hour, or the cream cheese filling will start to soften too much.
 Save
Save Every time I make these, I am reminded that the best recipes are the ones you can pull off without a lot of fuss but still impress everyone who tries them. Keep a batch in the fridge, and you will always have something sweet to offer when friends drop by or you just need a little treat for yourself.
Recipe FAQs
- → Can I make these truffles ahead of time?
Yes, these truffles store beautifully in an airtight container in the refrigerator for up to one week. You can also freeze them for up to a month, making them ideal for advance party preparation.
- → What can I use instead of pink candy melts?
You can use white candy melts tinted with pink oil-based food coloring, or substitute with any color candy melts to match your theme. White chocolate also works, though it requires careful tempering for best results.
- → Why is my coating too thick or lumpy?
Add a teaspoon of vegetable shortening to thin the melted candy coating. Stir well until smooth. Overheating can also cause lumps, so melt in short 30-second intervals and stir frequently.
- → Do the truffles need to be refrigerated?
Yes, these truffles should be stored in the refrigerator due to the cream cheese filling. They taste best served chilled and will maintain their shape better when kept cold.
- → Can I use a different cookie instead of Oreos?
Absolutely! Try chocolate chip cookies, graham crackers, or vanilla wafers. Keep in mind that different cookies will change the flavor profile and you may need to adjust the cream cheese quantity slightly.
- → How do I prevent the truffle balls from cracking when dipping?
Ensure the truffles are thoroughly chilled before dipping and that your candy coating isn't too hot. Let melted candy cool slightly before dipping, and work quickly to avoid temperature shock.